**EDIT 04/08/2021** – Updated to show implementation inside of new POSTman UI as well as set up utilizing the same environment and syntax used by the Salesforce provided API collection.
API calls are one of the most powerful tools available to an SFMC user. It essentially allows you to make changes, perform actions, retrieve data and more all programmatically via an outside resource.
Below I will give a quick overview on setting up an API integration package and then utilizing it in POSTman. This includes, creating the package, the component and gathering the required information from Salesforce Marketing Cloud down to creating the environment and setting up an authentication call and test calls inside of POSTman.
Creating Your Package:
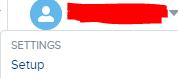
First you will need to go into the ‘Setup’ section which is under your user name in the top right of the screen. You will need to hover over it and the dropdown should have one of the first options being ‘Setup’.
From there you will want to navigate on the left sidebar to ‘Platform Tools’ and then expand ‘Apps’ and select ‘Installed Packages’.

Click on ‘New’ in the top right. This will open a popup asking for name/description of your new package.
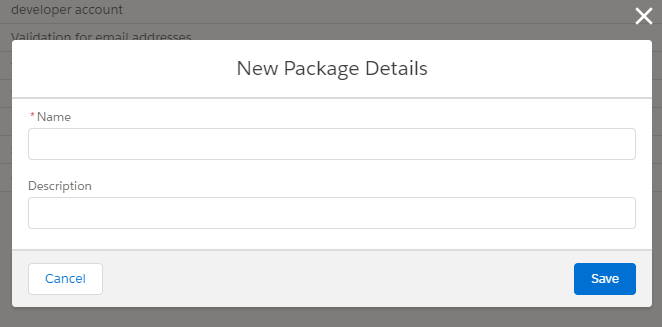
You then want to hit save to create your package.
Creating Your Component:
Next part is the creation of the component inside the package to allow utilization of API integration between your external system and SFMC.
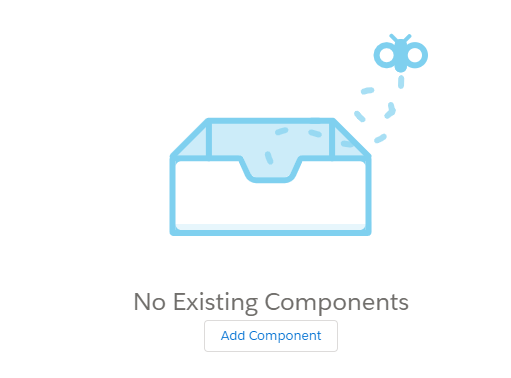
After building the package, this will then open up a screen with your new Package overview. The part we want to concentrate on is the bottom that involves ‘Components’. You will want to click on ‘Add Component’.
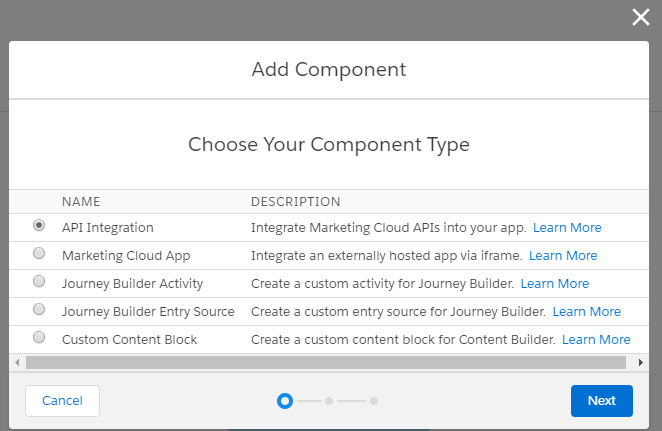
This will open a new popup to select the component type. For the purposes of this article, you will want to select ‘API Integration’. Then Click Next at the bottom.
Next you need to select your integration type. For this article, I am going to choose ‘Server-to-Server’ as this is only going to be used via POSTman or similar services. For more information on Component Types, see official documentation here.
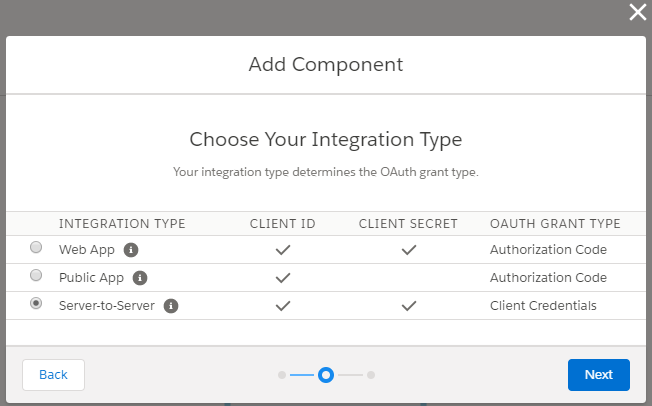
You will then need to assign the scope of your package (see official documents on scope here). For this article, I am going to allow full permissions on my package – basically allowing full access to the whole platform. After testing, you should make sure to go back and assign scope on your component as appropriate for your intended usage.
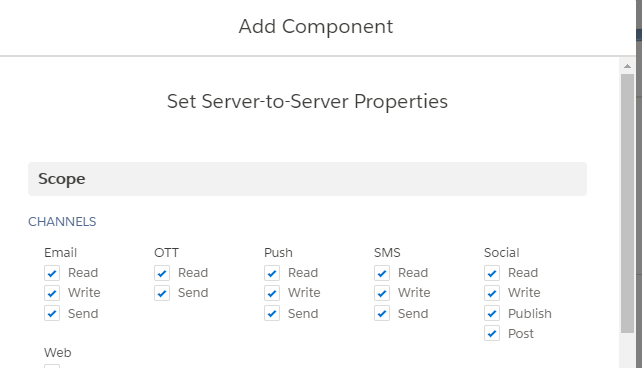
You then hit save and the new component will be added to your package.

You then will want to grab the following fields for use in your API call:
- Client Id
- Client Secret
- Tenet Specific Endpoint
These will be used inside your POSTman API calls.
**EDIT** I wanted to give a quick thank you to Vishal Kumar C V and Renato Oliveira for bringing up that I did not include the append needed to be added to the SOAP Base URI (/Service.asmx) for the SOAP API to work. See more details inside of this Stack Exchange post.
POSTman Environment Set Up:
Next we will work on setting up an Environment in POSTman to best utilize your new Package in SFMC.
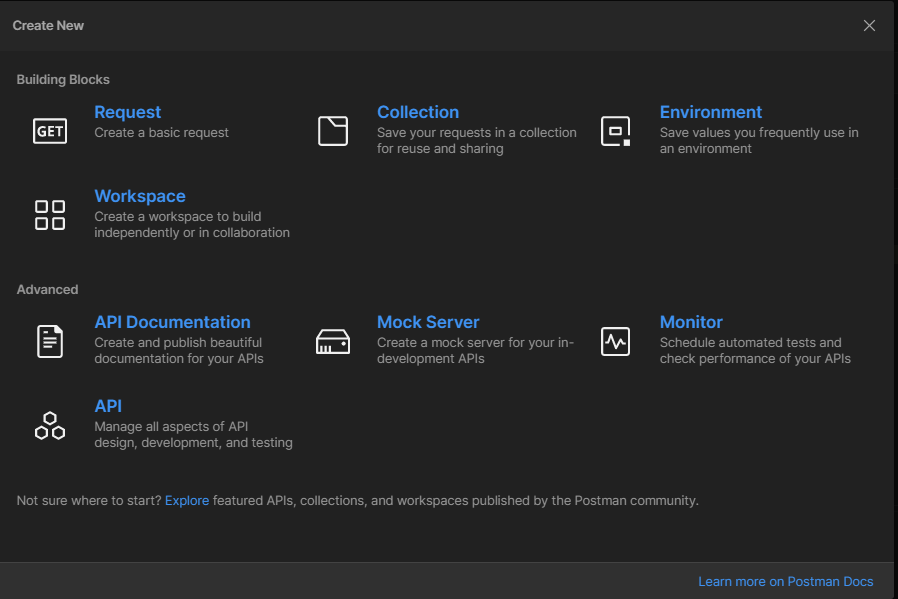
In POSTman you will want to click the ‘New’ button at the top of the side bar to the right of the ‘My Workspace’ label:

This will open the below window where you will want to select the ‘Environment’ option:
This is where you will add in the information you will need to be able to utilize SOAP and REST API calls to SFMC from POSTman
Sample completed Environment below:
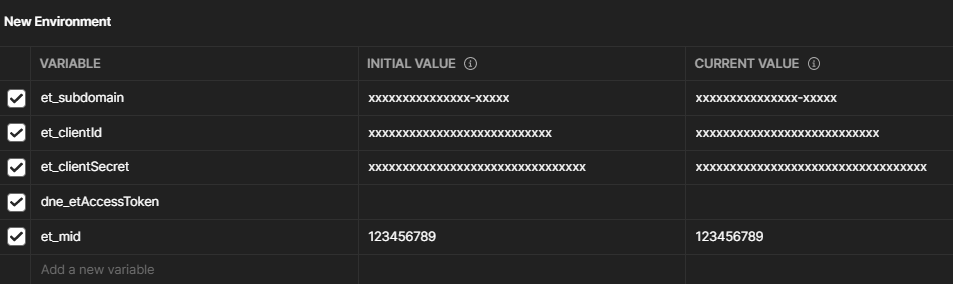
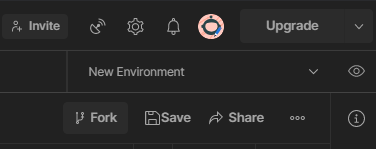
You will then be able to select this environment in the dropdown at the top right of your POSTman.
Making Your Authentication Call:
Now that you have your environment set up, you need to aim at retrieving your token so that you can do your REST/SOAP API calls. First things first, verify that your environment is selected in the dropdown in the top right of your POSTman.
Below is a quick overview of the call, that you can use if you have familiarity with POSTman to set up your call:
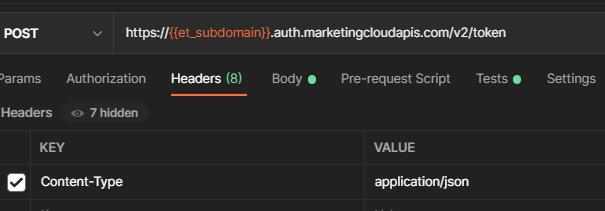
POST /v2/token
Host: {{et_subdomain}}.auth.marketingcloudapis.com
Content-Type: application/json

{
"grant_type": "client_credentials",
"client_id": "{{et_clientId}}",
"client_secret": "{{et_clientSecret}}",
"account_id": "{{et_mid}}"
}
For the visual learners, use the below images to help figure out where to put this information:
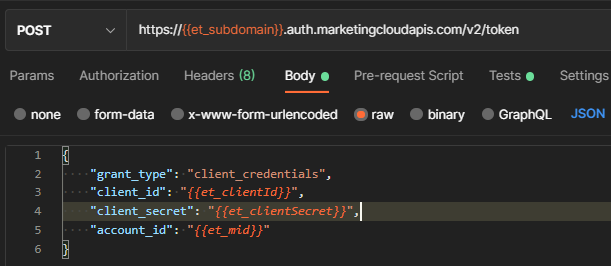
You will notice in my call, I have included a parameter account_id with a replacement named {{et_mid}}. This can be used to switch between BUs by assigning an MID to your environment and filling it in here. Please note that this can be included with mid being empty or null and it will still function as expected. You will need to properly set access to the Installed Package to access other BUs.
Another quick note to help auto-store your authentication is to utilize a script that can be added in the ‘Tests’ section in your Auth call. See below image and snippet:
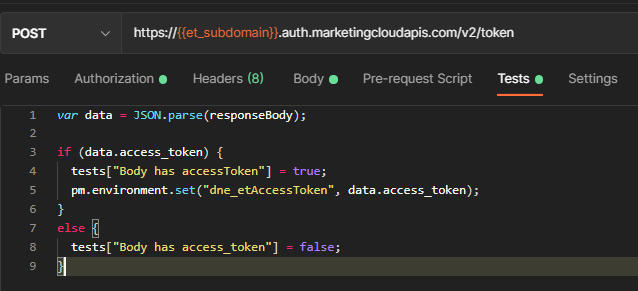
var data = JSON.parse(responseBody);

if (data.access_token) {
  tests["Body has accessToken"] = true;
  pm.environment.set("dne_etAccessToken", data.access_token);
}
else {
  tests["Body has access_token"] = false;
}
By adding this JS in, on each call of this, it will update the dne_etAccessToke variable in your environment with the returned token in your Response. As a note, you can also set up a similar Authorization process in the ‘Authorization’ tab on the call as well, but I tend to use the call and script option more often.
After setting all of this up, you will want to click the ‘Send’ button in the top right, near where you set your environment.
Example Response:

Your Test Call In REST API:
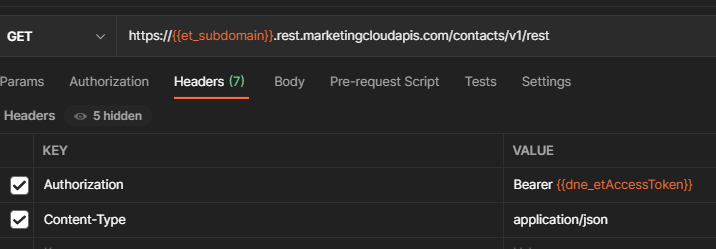
To test and make sure your environment and access token are set up properly, I am going to provide a very simple test API call. This call is basically a discovery call to gather all endpoints under a specific section. For this sample, we will use the ‘contacts’ section.
See below extract and image for setting up this call:
GET /contacts/v1/rest
Host: {{et_subdomain}}.rest.marketingcloudapis.com
Authorization: Bearer {{dne_etAccessToken}}
Content-Type: application/json
You then want to hit send in the top right. This should then return something like the below in the Response section:
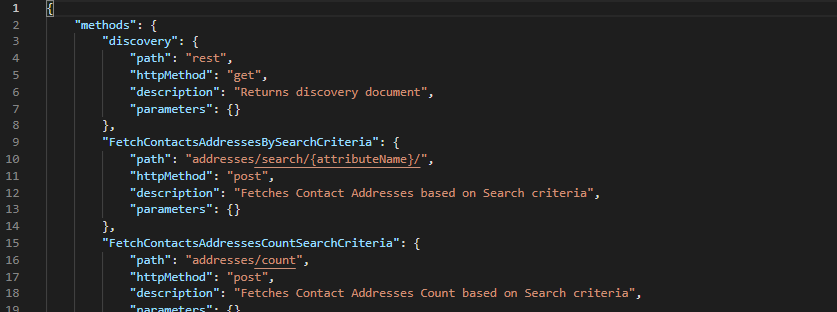
Congratulations! You have successfully completed a REST API call to your SFMC BU.
Your Test Call In SOAP API:
For this sample, I am going to do a quick example Retrieve on a Subscriber via SOAP. There are certain differences that need to be noted in SOAP that are not in REST.
Here is a down and dirty list:
- Method will always be POST
- Requires a header key of ‘SoapAction’ – value will mimic the request type. E.g. RetrieveRequest will be SoapAction = Retrieve
- You can put this directly into the Headers section like so:
SoapAction: Retrieve - Or you can put it into the Envelope Header (my preference), like so:
<s:Header><a:Action s:mustUnderstand="1">Retrieve</a:Action>...
- You can put this directly into the Headers section like so:
- Authentication is inside of the envelope header of the call, not in the Headers section like REST.
- SOAP utilizes XML for the payload, unlike REST which uses JSON
- The endpoint that SOAP aims at is universal for all calls, the envelope determines content and action
- SOAP has Methods (declared inside of payload/body) as well as Objects that are to be utilized to determine action and result.
- SOAP requires explicit declaration of Properties in retrieve calls
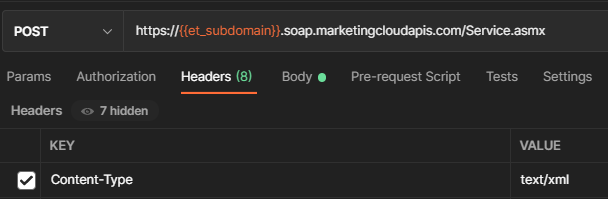
Below is an extract of the SOAP call on retrieving a subscriber:
POST /Service.asmx
Host: {{et_subdomain}}.soap.marketingcloudapis.com
Content-Type: text/xml
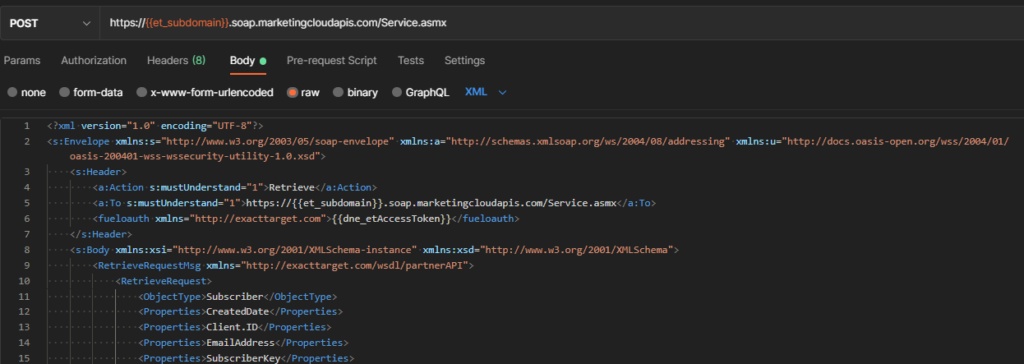
<?xml version="1.0" encoding="UTF-8"?>
<s:Envelope xmlns:s="http://www.w3.org/2003/05/soap-envelope" xmlns:a="http://schemas.xmlsoap.org/ws/2004/08/addressing" xmlns:u="http://docs.oasis-open.org/wss/2004/01/oasis-200401-wss-wssecurity-utility-1.0.xsd">
<s:Header>
<a:Action s:mustUnderstand="1">Retrieve</a:Action>
<a:To s:mustUnderstand="1">https://{{et_subdomain}}.soap.marketingcloudapis.com/Service.asmx</a:To>
<fueloauth xmlns="http://exacttarget.com">{{dne_etAccessToken}}</fueloauth>
</s:Header>
<s:Body xmlns:xsi="http://www.w3.org/2001/XMLSchema-instance" xmlns:xsd="http://www.w3.org/2001/XMLSchema">
<RetrieveRequestMsg xmlns="http://exacttarget.com/wsdl/partnerAPI">
<RetrieveRequest>
<ObjectType>Subscriber</ObjectType>
<Properties>CreatedDate</Properties>
<Properties>Client.ID</Properties>
<Properties>EmailAddress</Properties>
<Properties>SubscriberKey</Properties>
<Properties>Status</Properties>
<Properties>UnsubscribedDate</Properties>
<Properties>EmailTypePreference</Properties>
<Filter xsi:type="SimpleFilterPart">
<Property>SubscriberKey</Property>
<SimpleOperator>equals</SimpleOperator>
<Value>123456</Value>
</Filter>
</RetrieveRequest>
</RetrieveRequestMsg>
</s:Body>
</s:Envelope>Below are a few Screenshots to help provide further context:
This should then return a SOAP envelope with the requested fields shown above inside of it. See below image showing a response to the above call:

Congratulations! You have now successfully created, implemented and performed a SOAP API call to SFMC!
Collections And Environments
For future API calls, you can check out this POSTman library for some sample SOAP and REST API calls to get you started. They should offer a sample environment file as well as a collection file that fit within the same set up as I have above. At some point I am kicking around the idea of making my own collection, but have not gotten to that point yet. I will make sure to update if that happens!
Thanks for the post. I don’t have admin rights and need to have a package installed in one of BUs to “play and test” with API. Can Admin in my organization install the package on a specific BU so when I make calls e.g. create a folder or content or similar, the objects would be created in that specific BU not any other?
Correct. By default the Package will only affect the BU it was created in. If you create it at the parent level though, you can use the “account_id” section to send over an MID you want to target the calls towards in a child BU.
Thanks. Good news that I can request the package for a single BU. The parent level is not even available for me so I need to get something to get going.
Hello, thank you for your post. I found it useful and insightful.
I believe the code in the section three quarters down the page “below is an extract of the SOAP call on retrieving a subscriber” incorrectly defines the SoapAction as ‘Create’ when it should be ‘Retrieve’ ?
Cheers.
You are correct and good eye on that. Not sure how that happened in my copy/paste across, but it should now correctly reflect ‘Retrieve’ instead of ‘Create’. Thanks for spotting it and letting me know!
Great post Greg and thanks for putting this together.
When trying the SOAP API, I dont see the header ‘Key’ autopopulate with ‘SoapAction’ as I type. When I submitted the request, I get an error : ” An error has occurred and has been logged by our system.”
I see the error is related to and not sure how to fix it.
Do you have any suggestions?
Can you submit code snippets of what you currently have via my contact me form and I will try to take a look at it and let you know. Unfortunately without further info there is not much I can do to assist. You can also try pushing your issue into Salesforce Stack Exchange for assistance as well. To note, ‘SoapAction’ will not autopopulate, you will need to manually add this and the value into your API call.
Sure. Thanks much Greg
Do you have any solution for this, I am facing the same with Postman
I need your help on this.
Thank you very much!
This is one of the most comprehensive tutorials to make API calls to Salesforce. I had some difficulties with the SOAP calls. As I discussed this with you, all seemed to work fine at your end using Postman. I contacted Salesforce as you said and they recommended that I always use SoapUI. So, for now, I switch to that (it has a free open source version) and the same calls that did not work on Postman worked fine there. I leave this comment here just in case someone stumbles upon the same issue.
Thanks for the helpful post. I was able to successfully make the authentication call and it returns the Access token but when I try to test the REST API call as you’ve listed I am getting 403 Forbidden (x-mashery-error-code: ERR_403_FORBIDDEN) in Postman. Can you please help?
Was following all the steps succesfully until I reached the SOAP test call. After some trial and error I figured out I had to change /Services.asmx to /Service.asmx (without the ‘s’ at the end). Think this is a typo.
You are correct. Thanks for pointing this out. I will correct now.
And thank you for writing this awesome article!
Thank you!
How can I pass multiple records at a time using Rest API call?
Would need a lot more context on what this means – also, likely you will get a better response time and answer if you post a detailed question on https://salesforce.stackexchange.com/
Hello! I wanted to leave some feedback for a small difference in installed packages. v1 installed packages do not support being utilized in multiple business units and also don’t have the same syntax as a v2 package. They’re still in use in a lot of client accounts so if I may suggest amending the paragraph underneath the second auth call screenshot to include a reference to the SFMC docs on how to make an auth call with a legacy installed package and probably mentioning how to tell that it’s a legacy installed package. (See warning note attached as screenshot that shows up if package is legacy.) I think that small addition will round out this blog really nicely!
requestToken Reference for Legacy Packages
https://developer.salesforce.com/docs/atlas.en-us.noversion.mc-getting-started.meta/mc-getting-started/requestToken.htm
Reference:
Under the General heading, it lists a table for installed package type comparisons.
https://developer.salesforce.com/docs/marketing/marketing-cloud/guide/installed-package-types.html
Just a note mentioning they can still be utilized, but not created within client accounts.
https://developer.salesforce.com/docs/marketing/marketing-cloud/guide/create-integration-legacy.html
Also myself – Marketing Cloud Developer Support for years.
Have a great day and thank you for/I love your content!
Hello Cassie and thank you for the info and the recommendation. I left off the legacy package info as it is no longer something that can be built and it has been over a year since that was implemented. The legacy package also does not allow access to many of the newer endpoints, which means a good majority of people have switched off of legacy onto v2. That being said, the relevancy of that information is fairly small and to keep the topic on message and easier to understand, I removed any reference to legacy packages entirely.
I ended up using the Postman like journey builder activity from https://www.sfmc-postman.com/. Its a really powerful and essential tool to have. I have been able to make custom API request in Salesforce Marketing Cloud Journey builder.
It works exactly the same as postman.
You can also create templates, environment variables and use response variables in my journey. Their analytics is also great.